
Wifi Hotspot Windows 10
Wifi Hotspot Windows 10: If you are a Windows 10 PC user and using a wireless connection to access internet then you may also want to share the internet connection on other devices you are using. It is easy to do using a simple command and your desktop will be converted into a WiFi hotspot windows 10.
Technically speaking, this was used till now but since past few years the entire process has changed. Here are some few ways that can help Windows 10 users help create a WiFi hotspot on their PC.
Table of Contents
Ways to Create WiFi Hotspot Windows 10
Make WiFi hotspot using Command prompt
- Press – Ctrl+Shift+Esc, open the task manager
- Now click on “File” and Run new task to run command prompt ( Don’t forget to check “create this task with administrative privileges” )

- Type in the following command – netsh wlan set hostednetwork mode=allow ssid=AdHoc key=password and replace the SSID values plus key with your network name& password you wish to.

- Run the command as shown to start your network – NETSH WLAN start hostednetwork

Share internet connection with hosted network in windows 10
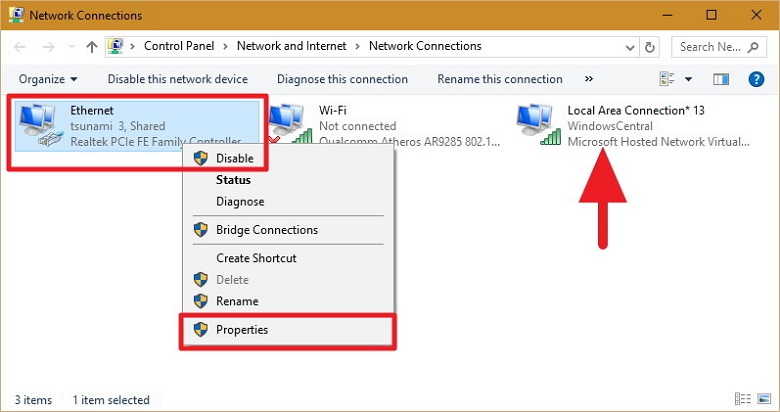
- In the Start menu hunt for – “View network connections.”
- Now right click the primary Ethernet connection you are using and select – Properties
- Underneath the tab – Sharing click on the box named as – “Allow other network users to connect through this computer’s internet connection.”
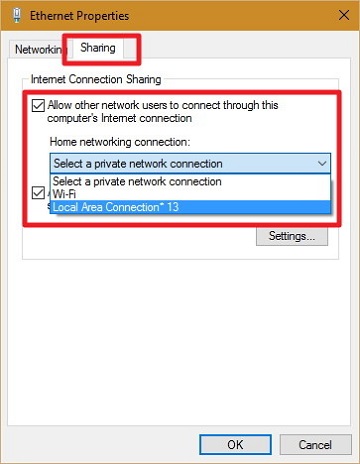
- Select network connection that is connected to the internet currently from the drop down box
- Click – OK
Related post: Find saved password in chrome
Now, you will get a new WiFi network which will be connected to the home internet you are using. Remember, it will only work till the time your Windows machine which has the network active.
Create WiFI hotspot windows 10 using Settings App
You can also set a mobile hotspot with Windows 10. The process is very easy.
- Press Windows and click on – Settings
- From Settings click on – Network & Internet
- Select the tab – Mobile Hotspot
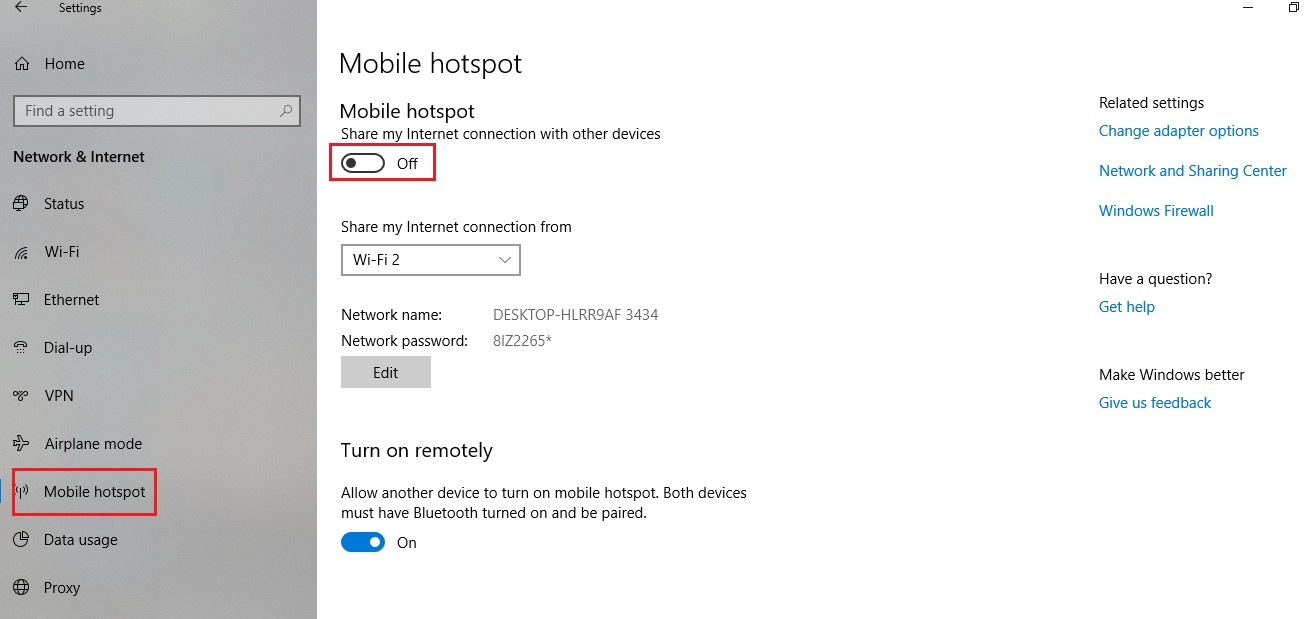
In case your Windows 10 PC is connected to broadband by WiFi and Ethernet together then the very important thing you should do is to select the place from where you wish to share the internet connection.
From the drop down list you can choose – Share My Internet connection and select either of the two options – Ethernet/WiFi
In order to proceed, click on toggle to switch on Mobile hotspot and once you turn it on the mobile hotspot becomes completely functional.
Remember, that Windows 10 hotspot can support only up to 8 connections. You can view the details of systems connected to your mobile hotspot currently by clicking the tab mobile hotspot.
When not in use you can turn off your mobile hotspot. To accomplish the task you need to disable it. Click- mobile hotspot and turn OFF and it will disable your mobile hotspot.
Some people also rely on third party software to create hotspots on their Windows 10. Such software can be helpful too, but following easy steps to create mobile hotspot on your Windows PC you can do it without relying on any other software.
It is easy and you can certainly share your internet connection on multiple devices. It will save your time and can be an option in need when you wish to access the internet on some other device.
Follow Us On:Ajit Yadav
Author Bio: Ajit yadav is a professional blogger and co-founder of WindowsClassroom. He is a software engineer by education and blogger & writer by profession.