How to Add SharePoint to File Explorer
Table of Contents
What is SharePoint
Microsoft SharePoint is a collaboration system based on a website and uses workflow applications, security features, “list” databases as well as other different web parts in order to empower various business teams for working together. It also offers companies to utilize the platform’s ability to control the access granted to information. It also offers the feature of automating workflow processes across different business units. SharePoint’s Microsoft Cloud version, SharePoint Online offers additional integration capabilities with different cloud applications. Let’s learn more about SharePoint, its uses, and how to add SharePoint to File Explorer.
Benefits of Utilizing SharePoint
SharePoint leads to increased productivity as well as information visibility for all types of workers in any business, either small or large. All of the features of SharePoint are based around the cross-collaboration experiences across the intranet that offers secure sharing, workflow collaboration features as well as content management among other features.
In the case of a website-based collaboration platform, SharePoint is quite easy to maintain. At a fundamental level, SharePoint is quite easy to understand for business users. It can also be customized infinitely and is massively scalable. SharePoint can be used in several ways by different businesses in order to increase productivity as well as return on investment. SharePoint has been an integral part of several Fortune 500 companies for the last 17 years. These top companies have been using SharePoint for improving working efficiency as an “Intranet” platform that crosses all the sectors of the business.
SharePoint Features
The unique features of this platform make it quite easy for individuals to work together on various ad-hoc projects. It also helps in establishing standard business processes for data recording, information sharing, as well as for document publication. Various features such as Security Controls, Outlook Email Applications, Co-Authoring and Versioning give business users the capability to do more work in a lesser time frame while maintaining work integrity. The platform also includes the following:
- The ability for requiring approval for documents before they are made visible to others
- The ability to “Check out” documents in order to prevent other users from editing or authoring the same
- The ability to get instant notifications whenever documents are uploaded or when changes have been made.
- The ability to make workflows by using the if/then logic in order to automate different actions like emailing documents, information recording, and so on.
- All these features of SharePoint increase the productivity of business users. One thing that SharePoint does much better than prior document collaboration systems is that it displays information with respect to the type of information/documents stored and additional info as to why they are stored.
You might also like: Quick access windows 10
How to Use SharePoint
Steps to Add SharePoint to File Explorer in Windows 10
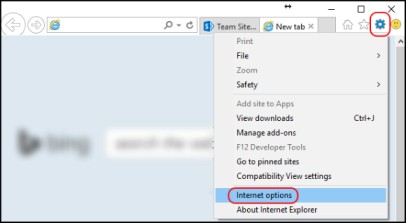
- You can start by clicking on Internet Explorer and select the Settings button.
- Next, select Internet Options.
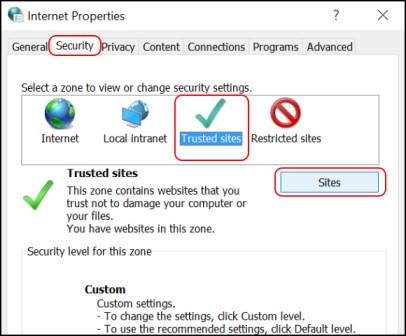
- On the Internet Options window, select the Security tab and click on Trusted sites and then select ‘Sites’.
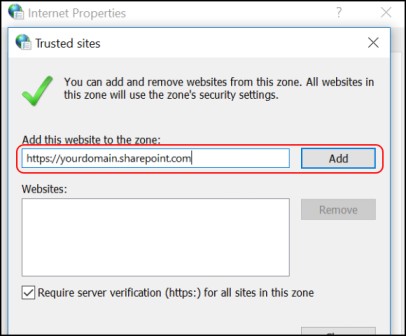
- Once the trusted sites window opens, type the URL of your SharePoint page and then click on Add.
- You can also fill in a wildcard option for your domain. For example, https://*.yourdomain.com. This step is completely optional.
- You will now have to close the zone window and select ‘OK’ in order to close and save the changed settings.
Open SharePoint using Internet Explorer Browser in Explorer Mode
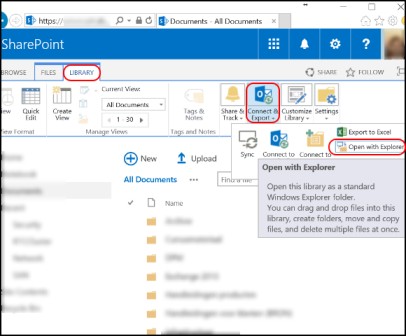
- Open a new Internet Explorer window and browse to your SharePoint site. Now go to any Document Library and click on Open with Explorer
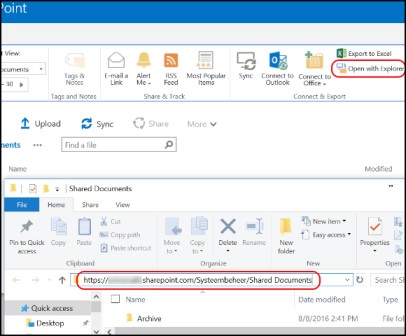
- Copy the URL address that is shown by Explorer. This is used for Drive Mapping with a new Drive letter that is connected to Windows when it automatically restarts.
Creating a Windows 10 Drive mapping to SharePoint
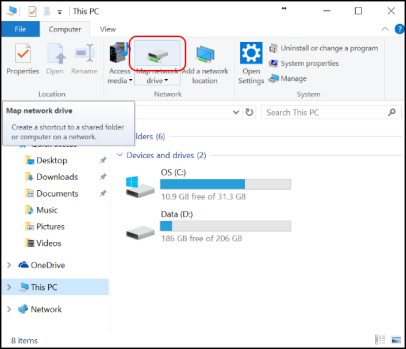
- Click on This PC (Computer) from File Explorer and select Map Network Drive.
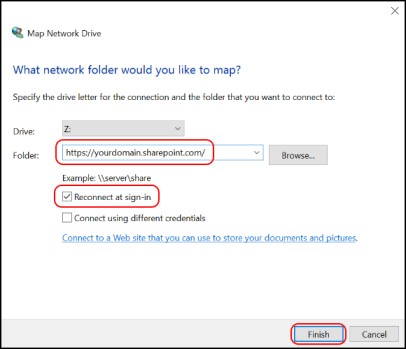
- In the new window, you can assign a drive letter or let it be. In the Folder field, type in your SharePoint URL in the previous step.
- Also, check the option Reconnect at Sign-In so that it auto connects when Windows restarts.
- Lastly, click on Finish to complete the drive mapping process. Now, you can easily navigate your SharePoint content in Windows 10 File Explorer.

