
Windows Sandbox
Table of Contents
What is Windows Sandbox
Windows 10 Sandbox: Quite recently, Microsoft launched the Windows Sandbox feature for the Windows 10 Build 18305 and its later versions. It is a new lightweight desktop application and is available for the users of Windows 10 Pro as well as the Enterprise users. A majority of us are always skeptical with respect to downloading and installing any executable file on our system. This is mainly because if it doesn’t work out, then we might have to clean install Windows 10.
Windows Sandbox is aimed at solving this problem by keeping your core Win 10 OS safe and secure. Windows Sandbox is nothing but an isolated desktop application that can run any kind of executable file without the fear of loss of data or even corruption of the system OS. Irrespective of the file you install, it always remains here without affecting the host system. Whenever you choose to close Windows Sandbox, only then will you lose all of your data and applications.
How to enable/disable windows 10 sandbox
There are three different ways in which you can either enable or disable Windows Sandbox in Windows 10. They are as follows:
Method 1: Using Control panel
Method 2: Using PowerShell to turn Windows Sandbox On or Off
Method 3: Using the Command Prompt
You must always remember that you must be signed in as an administrator in order to either turn Windows Sandbox on or off. Also before turning it on or off, you must make sure that the virtualization option is enabled in the UEFI/BIOS Settings. You can follow the below-mentioned steps to do the same –
- You will have to press the Ctrl+Alt+Delkeys and select Task Manager.
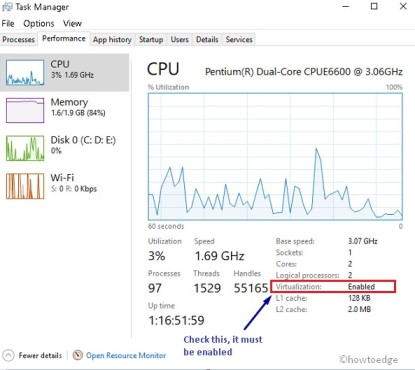
- You will then have to select the ‘Performance’ tab and check if the current page shows that the virtualization option is enabled.
After confirming the same, you will follow this procedure in order to either enable or disable the Windows Sandbox feature on Windows 10.
1. How to Enable/Disable the Windows Sandbox Feature using Control Panel
- You can start by typing “control panel’ in the Search bar and select Control Panel
- On the newly opened tab, you will have to select Programs and then choose the Programs & Features
- On the left side of the tab, you will have to choose the link for Turn Windows features on or off.
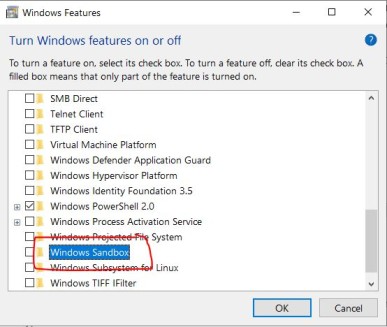
- You will now have to locate the Windows Sandbox option from the list mentioned in the opened window.
- You can either enable or disable the Windows Sandbox option by activating or deactivating the checkbox.
- Click on the OK button and restart your system in order to apply the changes.
2. How to Enable/Disable the Windows Sandbox Feature using PowerShell
- You can start by right-clicking the on the Start icon and selecting the Windows PowerShell
- You will then have to select the Yes option in order to grant access if the UAC prompt comes up.
- Now, you have to copy and paste the below-mentioned code on the PowerShell window and hit enter if you wish to enable Windows Sandbox –
Enable-WindowsOptionalFeature –FeatureName “Containers-DisposableClientVM” -All -Online
- If you wish to disable the Windows Sandbox option, then just copy & paste the mentioned command:
Disable-WindowsOptionalFeature –FeatureName “Containers-DisposableClientVM” -Online
- You can now restart your system if the prompt asks for the same. You can Select Y for authorizing the same.
3. How to Enable/Disable the Windows Sandbox Feature using the Command Prompt
- Just type “cmd” in the Windows search bar on the desktop.
- Now, select by right-clicking on the Command Prompt app and select Run as administrator. If you’re prompted by the User Account Control window, just click on Yes
- Now, you’re in the command prompt window with a black background.
- Copy & paste this code to Enable Windows Sandbox:
Dism /online /Enable-Feature /FeatureName:”Containers-DisposableClientVM” -All
- Copy & paste this code to Disable Windows Sandbox:
Dism /online /Disable-Feature /FeatureName:”Containers-DisposableClientVM”
- In the next prompt window, select Y to restart your PC.
How to Run Windows Sandbox in Windows 10?
We found out how to enable/disable Windows Sandbox in Windows 10. Now, follow these steps to start Windows Sandbox to test out any new executable file or app.
Note: The Windows Sandbox feature has to be enabled before these steps.
- From the Windows search bar, type “windows sandbox” and then select the app.
- When UAC is prompted, just hit Yes.
- Now use Ctrl+C to copy to executable file
- Then use Ctrl+V to paste the executable file on Windows Sandbox desktop.
- Run the executable file as you normally run the other files in Windows Sandbox and follow the instructions onscreen,
- Once all the instructions are completed, you may exit the Windows Sandbox app and click on Ok. Once you exit, the sandbox contents will be automatically deleted.
Ajit Yadav
Author Bio: Ajit yadav is a professional blogger and co-founder of WindowsClassroom. He is a software engineer by education and blogger & writer by profession.