How to Record Screen on Windows 10
How to Record Screen on Windows 10: Windows 10 has innumerable features to explore that make tasks simple and easy. If you want to record whatever you are doing on screen, whether playing games or making a video call, performing a financial transaction, making a tutorial video, or pretty much anything else, it can be done quickly with an in-built feature and 3rd party software as well. In this tutorial, we will show you how to record screen Windows 10 without spending a penny on any fancy software.
Table of Contents
Ways to Record Screen on Windows 10
1. Windows 10 Game Bar – Windows 10 Screen Recorder
Screen recording on windows 10 is very beneficial when you wish you share a clip with your social media friends. And the Windows 10 built-in app that helps you record screen easily is the Game Bar. If you are not a gamer, maybe you aren’t aware of the amazing features that come with the Windows 10 Game Bar.
In Windows 10, the Game Bar is an Xbox feature that is still very useful on your Windows machine. Once you open Game Bar, it may ask you whether you want to record a game. Just check “yes” even if you are not recording the gameplay. Once you tick the checkbox, it works great to record everything that you have on screen. To use the app, it is essential to login from your Microsoft account or set up a free Xbox live account to view the recordings.
With that said, follow the steps mentioned below to understand the process of recording Windows 10 screen.
Steps for Screen recording windows 10 using Game Bar
- Using the Windows 10 Game Bar to screen record Windows activity is a wiser option, To get started you can go to the start menu search box and type “Game Bar” to find the Xbox Game BarOr, you can be quicker by using the shortcut keys – Windows Key+G simultaneously. As you press, the Game Bar app appears. If it doesn’t appear, go to the Windows Store and download the Game Bar application.If still, it doesn’t load, you can manually navigate to Start > Settings > Gaming > Game Bar.
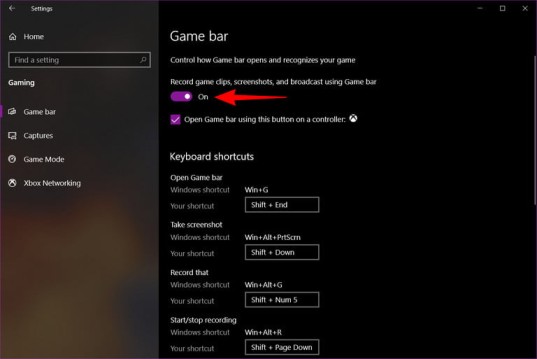
- Under the Game Bar window, make sure some options have been toggled ON like record clips, take screenshots, and broadcast.
- The screen displays the keyboard shortcuts for every activity.
- To open the Game Bar, you have to click Win+G
- To take a screenshot, the shortcut is Win+Alt+Print Screen
- To start/stop recording, the Windows shortcut is Win+Alt+R.
The Game Bar allows changing the shortcut commands for convenience. If you find it difficult to recall Windows shortcuts, you can keep easier shortcuts as per your choice.
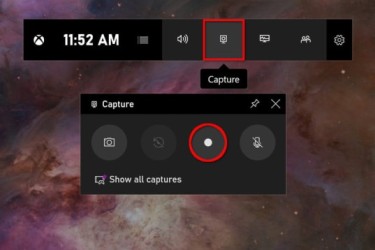
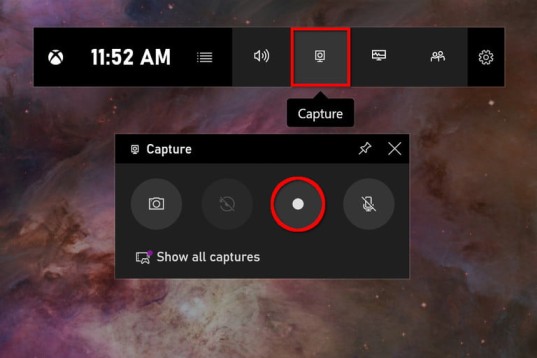
- Press Win+G to open the app. Now, the Game Bar app appears on the screen’s top center edge. It displays several buttons such as start, stop, capture, sound, overlays, etc. The capture overlays display by default; if not, click on the webcam icon on the Game Bar. As soon it displays the capture overlay, you can start recording.
- Press Win+Alt+R to start recording and press it again to stop. Make sure when you record the other windows are not open, in case it doesn’t record the wrong one. The dot button on the bar is the recording button.
- As you finish the recording, a notification displays on the right edge of the screen “Game clip recorded”. If you click on it, it directly opens the capture folder. If not, alternatively you can open the capture folder.
- To access your recordings, go to the My PC > Videos > Capture folder where the recordings are saved in MP4 file. The videos can also be accessed from the Game Bar.
The app does not allow changing the output folder and saves the recordings in the above folder. Whereas, you can customize the settings for video quality and resolutions, and you can choose either standard or high.
How to add voice during record screen windows 10
In case, you need to record your voice along with screen recording windows 10, it is also possible. Use the shortcut command Win+Alt+M to turn off the microphone and press the keys again to turn back on. Adding a voice narration to the videos becomes simple with the above features. You can easily add voice or mute while recording. Taking a screenshot can be done in seconds with a command Win+Alt+Print Screen. Hence, both the files get saved in the folders. The screenshot is saved in Jpeg format.
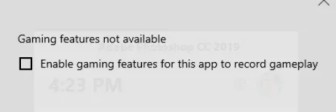
The Game Bar feature can be used as screen recorder Windows to capture all kinds of on-screen activities. For example, if you wish to record an activity in Adobe Photoshop or web browser, you may get an error message that “gaming features not available”. In such cases, you can enable the checkbox to enable gaming features for that app.
2. Record Screen Using 3rd Party Software
If you feel any difficulty in recording screen on windows 10 with Game Bar, you can try any third party software. Before using any third party screen recorder you must check it’s authenticity and reviews to avoid any harm of your PC. There are so many third party windows 10 screen recorders in market and some of those are below:
- ActivePresenter
- OBS Studio
- Camtasia
- Screencast-O-Matic
- Icecream Screen Recorder
Follow Us On:


