
How to Record Screen on Your Windows?
If a picture is worth a thousand words, then a video is worth a million words. Screen recording in Windows is a great method, whether you’re showing someone how to perform a task in an important application or you want to show off your gaming sessions.
Both Windows 10 and Windows 11 have screen recording capabilities built into them as part of the Xbox Game Bar tool, but it has some limitations, including that it can only screen record one application at a time and not the entire desktop. If you’re using Windows 11 build 22621.1344 or later, the Snipping Tool now has a screen recording feature and lets you select a specific area of your desktop, but it’s not a perfect solution either (it doesn’t capture audio, for example). If you want more options, you might also like to use a more robust third-party app for screen recording as OBS.
In this article, we will show you how to use third-party tools to record screen in Windows 10 or Windows 11.

Table of Contents
Use a desktop program to record your screen
WonderFox HD Video Converter Factory Pro is a versatile recording software suitable for beginners, providing the easiest solution for recording Windows computer screen videos. You can capture a computer window, a specified area or the entire screen for a long time and save it as a high-quality MP4/MOV/MKV/AVI file. You can set the video frame rate, quality, etc. as needed. Of course, when recording screen video, you can also capture your computer’s audio (system sound and microphone sound). It also comes with simple editing tools that allow you to crop the screen/time size of the recorded video or merge multiple videos into one. You can also convert videos to more than 500 formats and presets, and adjust parameters like resolution. Additionally, the software has a “Download” feature that allows you to save videos/music from over 1000 websites like YouTube.
Step 1: Download and install HD Video Converter Factory Pro on your Windows PC to get ready.
Step 2: Open the program and select “Video Recorder” on the main interface to enter the screen recording window.
Step 3: At the top of the program window, select the first “Custom” mode to record any part of the screen; select the second “Full Screen” mode to capture your computer’s entire screen.
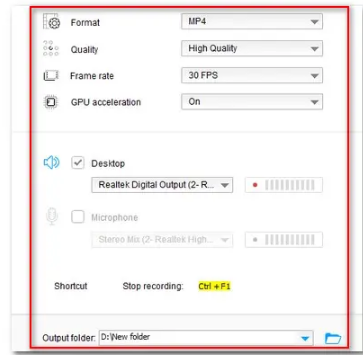
Step 4: Move down to set the recording format, quality, frame rate, and audio source. Click the bottom triangle button to change the output folder or keep the default folder.
Step 5: Click the “REC” icon and video recording of the computer screen will start after a 5-second countdown.
To end shooting, press the hotkey “Ctrl+F1”.
You might also like: How to take screenshot on Windows 10
Record screen with Clipchamp
If you have a Windows 11 computer, you may have used an app called Clipchamp. This standard application not only allows you to edit videos for free, but also allows you to record videos on your computer. In “Screen” mode you can record video of your computer screen, in “Camera” mode you can capture your computer’s camera input screen, and in “Screen and Camera” mode you can capture your computer screen and camera input screen simultaneously. You can edit recorded videos on the spot and output them in the highly versatile MP4 format.
Here we take “Screen” mode as an example to briefly introduce how to use Clipchamp to record videos on your computer. By the way, you can also install this app for free from the store on Windows 10.
Step 1: Type “Clipchamp” into your computer’s search box and launch the application. Next, click the “Create New Video” button to create a project to record a video of your Windows computer screen.
Step 2: Click “Recording and Creation” on the left menu bar and select “Screen”.
Step 3: Click the pink round recording button and select the recording target. Clipchamp allows you to take a photo of a window or the entire screen.
Step 4: Click the “Share” button to start recording video of your computer screen immediately.
Step 5: Click the “Stop Sharing” button to end recording.
Step 6: Click “Save and Edit” to save the captured video to your computer. Of course, you can also make various edits and click the “Export” button to output the video.
Final words
In this article, we introduce how to use WonderFox HD Video Converter Factory Pro and Clipchamp to record videos on Windows 10/11 computer, we hope it will be helpful to you.
To capture the camera input screen you’ll need to use Clipchamp, but if you just want to capture your computer screen and save it as a video, WonderFox HD Video Converter Factory Pro is more suitable. It is more convenient to use and you can specify any area for shooting. You can also convert, edit and compress videos easily.
Follow Us On:Ajit Yadav
Author Bio: Ajit yadav is a professional blogger and co-founder of WindowsClassroom. He is a software engineer by education and blogger & writer by profession.