

How to Disable Autofill Chrome
How to Disable Autofill Chrome: There is no doubt about the fact that Google Chrome is one of the most-preferred web and mobile browsers at present. The primary reason for its popularity is it is fast, more user-friendly, more responsive and it hangs a lot less compared to the other web and mobile browsers like Opera Mini, Mozilla, Safari, and Internet Explorer. It displays pages quickly and you can drag tabs out in separate windows without any difficulty.
Table of Contents
How Does Autofill in Chrome Work
One of the most convenient features that Google Chrome offers is the Chrome Autofill feature.
The chrome autofill option helps us fill the repetitive data so that we don’t have to manually update it every time. It also helps us get rid of the monotony. So what actually is the Chrome autofill feature?
By default, the Google Chrome browser saves certain information while you enter them into different website forms. The information includes your name, email address, pin code, passwords and more. Chrome’s autofill feature will use the information next time when you are prompted to enter similar information for a different website. The autofill feature saves time and effort by offering an element of convenience. But not everyone is comfortable in enabling this feature. We will show you how you can disable autofill in Chrome in this article.
Reason to Disable Autofill in Chrome Feature
Yes, it is true that the autofill feature might offer you convenience by preventing repetitiveness, but it comes with a lot of risks as well. With the Chrome autofill feature, it not only stores your contact information, but it can also store data of your credit cards, including the CVV code and expiration date.
No one wants to share their credit card information or other passwords with Google, especially on a shared or work computer. If multiple users operate the same machine, then it’s certainly NOT safe. This is why it is important to disable Chrome autofill feature. Just follow the detailed steps below to disable Chrome autofill feature.
Steps to Disable Autofill Chrome
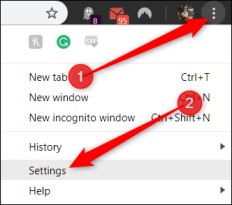
- Once you start Chrome, you have to click on the menu button (the three buttons at the top right corner of the screen).
- Then you have to click on Settings. Alternatively, you can also type in the address bar chrome: //settings/. You will be directed to the settings page of Chrome.

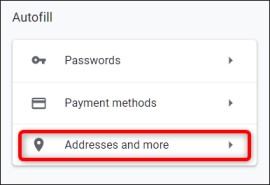
- The next step is to scroll down until you find the autofill section. There will be three sections. These include, “Passwords”, “Addresses and more” and “Payment methods”.
- Click on Passwords. From here you can disable the feature Save passwords and also untoggle the Auto sign-in
- Click back and then go to Payment methods. In this section, you can untoggle the save and fill payment method
- Click back and go to Addresses and more. Here you will have the option to untoggle Save and fill addresses.

If you want to remove the already saved addresses after you have disabled the Chrome autofill feature manually, let us share how you can delete them. Go to Addresses and more, and click the menu icon next to the saved addresses and then click on delete. The entry is immediately deleted without any warning. So, be sure that you want to delete the information.
How to Clear the Autofill Data in Chrome
If you want to take things a step further, then it is better to clear all the autofill data in Chrome. Remember that this will clear all passwords stored for other websites as well. So, before going for this, be sure that you want to delete all the information.
- The first step is to click on the Chrome menu.
- Then go to Tools.
- Click on Clear browsing data.
- At the top, you have to choose The beginning of time to clear all the saved data.
- Be sure that the Autofill form-data option remains checked as well.
- If you want to keep everything, like passwords, cookies, browsing history and more, then make sure to uncheck those boxes. Or else, those data will get deleted.
- Once you are done ticking and un-ticking the boxes, then click on Clear browsing data.
This might take some time and will depend on how frequently you clear the browsing history.
Disable Autofill in Chrome Mobile Browser
Remember that the Chrome autofill feature works in mobile applications as well. To disable autofill chrome feature in mobile devices, here are the following steps you need to follow.
- Tap on the Chrome mobile app and then go to the Chrome menu (the same three dots on the top-right corner).
- Go to Settings.
- Just like how we did previously, you need to go into each of the submenus for Passwords, Payment methods, and Addresses and more and untoggled the switch to save certain data.
Summary
You can rest assured that disabling chrome autofill feature will not affect any forms of payment you registered with Google for covering Google Pay transactions. While going through with all these above mentioned steps, you will receive multiple “prompts” or pop-up messages. Please don’t ignore them. Make sure to read all the prompts carefully before you wipe out all the data that is saved in your Google Chrome. The next time you fill a form, you have to rely on your physical memory.
Follow Us On:Ajit Yadav
Author Bio: Ajit yadav is a professional blogger and co-founder of WindowsClassroom. He is a software engineer by education and blogger & writer by profession.