
How to Password Protect a Word Document
How to password protect a word document: If you wish to protect your word document with a password then there are different ways to do it. You can set up a password, limit permissions the information stored in your word document.
The article elaborates on the ways that help you to password protect word document and these methods are suitable for all versions of Word 2010 and also the latest versions of Mac and Windows.
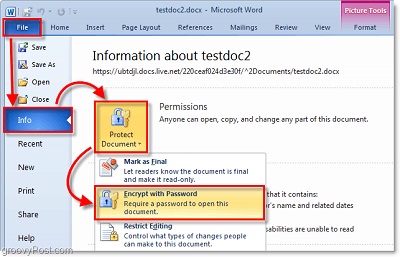
When you view your word document you will see the File option which will direct you to the Info screen. You can find a set of tools known as Protect Document that offers a dropdown menu laying out 3 different options that allows you to add a range of password protections to the word document.
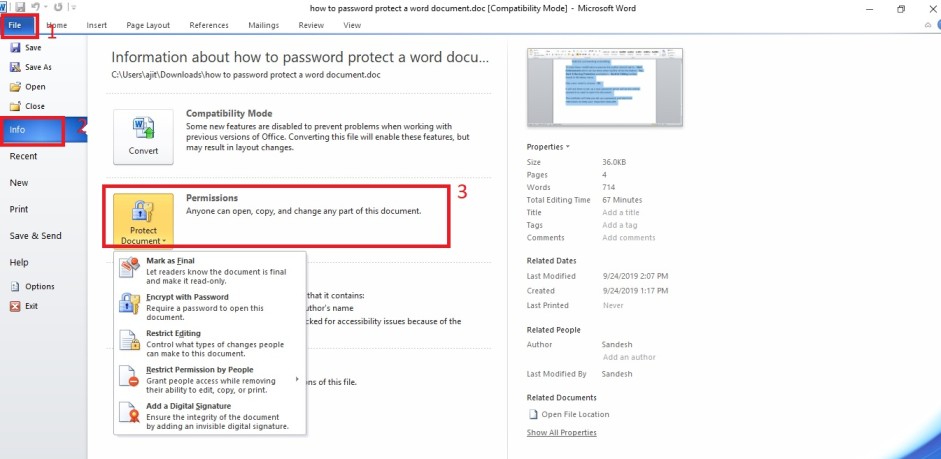
Table of Contents
Methods to Password Protect a Word Document
1. How to password protect a word document using Encrypt Document
I. Conceal with a Password in windows 10
- In the section Protect Document you can see the option that says -is Encrypt with Password.
- Click that option and it will show you the window – Encrypt Document
- It allows you to set a password for your word document.
II. For users of Mac 2011
If you are using Mac 2011 users just follow the path given below
Word—Preferences–Personal Settings—Security–Password to Open
III. For users of Word for Mac 2016 & Office 365
Review—Protect Document so that you can reach the menu for Security to create the password
One thing that you need to remember with this password feature is that it doesn’t have an option for recovery so if you lose the password you will strictly be not able to view or open the document.
You will be asked to enter the password you choose to enter twice in order to confirm it. After that you need this password each time you wish to open the document.
Only when the correct password is entered you will be able to edit, read it else not.
Related post: How to remove password from word document
2. Mark as Final option to Password protect a word document
Only for the users of Microsoft Office for all versions post 2010 in Windows
When you choose – “Mark as Final” it will tell the person opening the document it is a “Read Only” document and they are not allowed to edit the document.
In this document the person opening the document can see the editing marks, comments, tracked changes hidden.
You can see a banner which is located at the top of word document to let the readers know about the status of the document. It is the newest option that helps the readers to click on the option- Edit Anyway and make changes to the document.
It actually offers the option to share the content while allowing the participants view as the document complete.
3. Password protect a word document Using Limit Editing
I. For windows users
Upon choosing the option – Restrict Editing lets the authors get some to options to restrict various options for the document. You will be able to access the option via – Review tab present in – Protect toolbox
II. For Word Mac 2011 users
They need to follow the path given below
Word—Preferences–Personal Settings—Security–Password to Modify
III. For Mac 2016 & Office 365 users
Review–Protect Document to view -Protection window. Next, choose options – Protect document for
Note: Editing Restrictions is quite useful option. You need to check the box below this option and it will give you the liberty to restrict any user for editing your document Checking the box under that option provides the ability to limit user editing with 4 four options at your display:
- Comments
Helps users include comments in word document, but not allow editing the text
- Tracked Changes
Can make few changes with restricted monitoring
- Filling in Forms
Let users fill up a few pre-set sections
- No Changes
Restricts commenting and editing
To help these modifications execute the author should opt to – Start Enforcement which can be done when he/she clicks the button – Yes, Start Enforcing Protection available in – Restrict Editing toolbar found in Windows menu.
Mac users need to choose – OK.
It will ask them to set up a new password which will be the similar password as used to open the document.
The methods will help you set up a password and also limit restrictions to keep your important data safe.
Follow Us On:Ajit Yadav
Author Bio: Ajit yadav is a professional blogger and co-founder of WindowsClassroom. He is a software engineer by education and blogger & writer by profession.