

How to Run Linux on Windows 10
Run Linux on Windows 10: There is no doubt about the fact that Linux is one of the most popular operating systems. The reason why it is so much preferred is that it is open source and it is easy to install. Apart from that it also comes with a plethora of customization options, being highly secure and more friendly for developers. Let’s understand how to install and run Linux on Windows 10.
We need to understand that there are several versions of Linux operating systems, which are called Distributions. Out of the hundreds available, Ubuntu is the most popular and friendly Linux distribution that is available for free to download and install. In this guide, we will take you through the process to install and run Linux (Ubuntu 18.04) on Windows 10. Before we get into the details, let us share the pre-requisites.
Table of Contents
Requirements to Run Linux on Windows 10
- A device running Windows 10 with constant power supply
- Ensure that you have a minimum disk space of 5GB
- A USB drive that has the latest version of Ubuntu
- Ensure your data is backed up
Installing Ubuntu Along with Windows 10 (Using Dual-boot)
The first thing that you need to do is create a backup of Windows 10. The process is risky and few errors will result in an inconsistent system. Yes, whether you want to create a backup or not, is solely up to you (it is not compulsory). Once the backup is done, you can prepare for Ubuntu installation along with Windows 10.
For creating the backup of Windows 10, you can opt for the default backup utility. With the backup created, you may restore anytime if you come across any error.
Now, we come to the steps required to install Ubuntu on Windows 10. Please note that the installation of Ubuntu is not as straightforward as installing any other software. For the sake of clarity, we have divided the installation process into 4 different parts. You need to follow the steps given in these 4 parts in the same order to install Ubuntu without any hassles.
Following is the 4-part process to be followed to install and run linux on windows 10
- The first part is to download the Ubuntu ISO image file. We are going to install Ubuntu 18.04.4 LTS desktop version.
- In Part 2, we create a bootable USB drive for writing the Ubuntu image file onto a USB. In this part, we utilize a tool called unetbootin.
- In Part 3 of the installation process, you need to shrink the partition size for Windows 10 so that space is created for Ubuntu.
- Lastly, in Part 4, run Ubuntu Live Environment and then install Ubuntu.
Step 1: Download Ubuntu 18.04.4 ISO Image
The first step is to open the browser, go to the address bar and type the following URL
https://www.ubuntu.com/download/desktop.
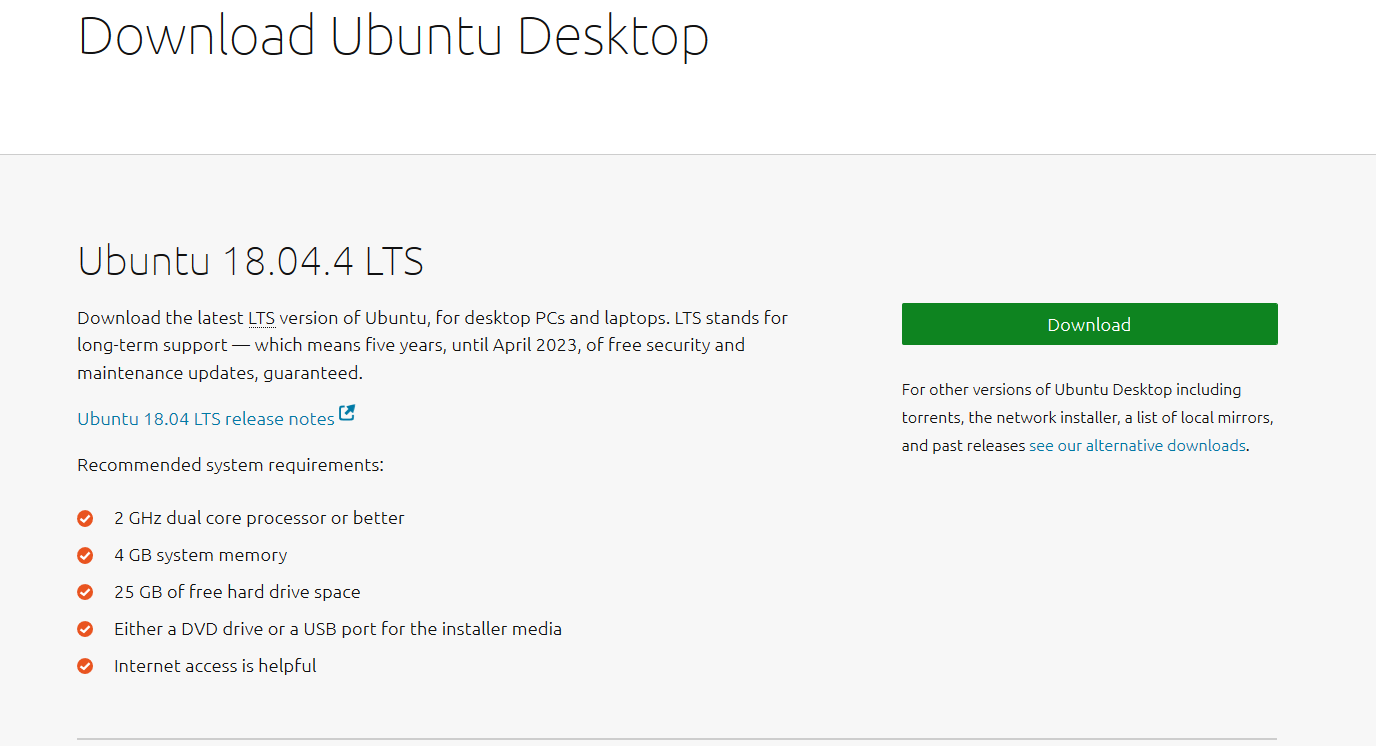
Once the link opens, click on Download. Let the download complete and you will be able to create a bootable USB drive.
Step 2: Creating Bootable USB drive
For creating the bootable USB drive, make use of a tool named “unetbootin”. Before you run this tool, you need to ensure that the USB stick is in FAT32 format. If it is in NTFS format, then you have to change it into FAT32 format. You may choose to back up the content of the USB drive because all the data will be lost after formatting.
To format the USB drive in Fat32 format, you have to do the following things.
- Plug-in the USB drive into your Windows 10 device.
- Open Windows explorer by pressing Win+E buttons, and click on This PC
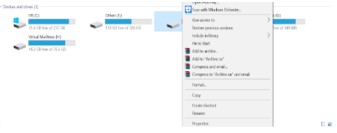
- Now, right-click on the USB drive.

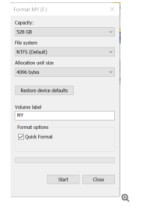
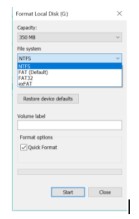
- Just click on Format option and wait for a window.

- Check if the File system is labeled as FAT32. If it’s not, then select FAT32 from the dropdown list and click on the Start

- Once the format is complete the USB drive remains within the FAT32 file system.
Now the USB is formatted along with the FAT32 file system. You can download the “unetbootin” tool that we mentioned above to create a bootable USB.
How to download and install unetbootin tool
In the following section of the article, we are going to share the steps for downloading and installing the unetbootin tool.
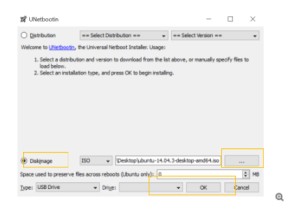
- The first step is to download the tool from the URL https://unetbootin.github.io/. Follow the instructions on the site to download and install the tool. Next, run the tool.
- Then you need to select the Disk Image
- Browse & select the path where you downloaded the Ubuntu ISO file. Along with that, you need to select the USB drive where you want to install the Ubuntu setup. Once it is done, click on OK

- The setup starts making bootable USB and it will also notify when the process is complete.
When the bootable USB drive is ready, you need to ensure there is enough space for installing Ubuntu. We are going to make use of the windows disk management utility to shrink up the space for Ubuntu.
Step 3: Make space for Ubuntu by Shrinking C: drive
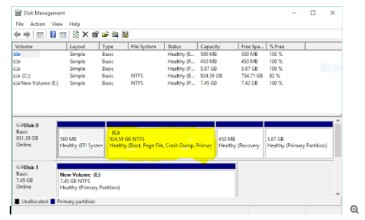
The tool that we are going to use for shrinking space for Ubuntu is the “Windows disk management tool”.
- You need to start the disk management tool by right-clicking on the start button on the left of the screen and then choose the Disk Management option.
- You will see a window that displays all the drives available.

- You have to right-click on the drive that has the biggest space (usually it is the C: drive) and then select the Shrink volume option.
- You get a window showing the best size possible. Adjust the size according to the requirements and then click on Shrink.
- The process will start and a brand new unallocated partition will be created once the process is complete. You can install Ubuntu in this new partition.
Step 4: Install and Run Ubuntu 18.04.4
You need to first run Ubuntu live environment in order to install Ubuntu on windows 10. For running the Ubuntu live environment, it is important to reboot the PC and then load boot-up menu. Mostly, if you press the F12 menu, the boot-up menu will load in the system. However, in a few machines, the boot-up menu can be accessed by pressing the ESC, F2 or F10 keys as well.
Run Ubuntu live environment:
- After the boot-up menu shows up, you need to select USB FLASH DRIVE option and press enter.
- The process begins and after the process is complete, you will get the option of how you would like to use Ubuntu.
- You have to select Try Ubuntu option and then press enter.
- The Ubuntu live session starts, and you can check out the live session. But once you restart the machine, the live session will be over. So, to keep the live session constant so you can install Ubuntu on the hard disk.
Steps to Install Linux (Ubuntu) on Windows 10
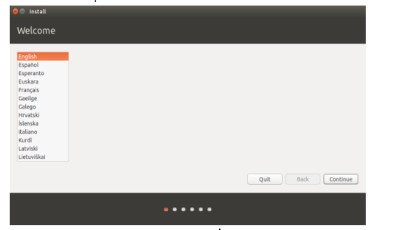
- To install Ubuntu on your system’s hard disk drive, you need to double-click on Install Ubuntu icon from the desktop. Once you click on the Install Ubuntu option a wizard is going to come up showing that the Ubuntu installation has started.
- You need to select your preferred language and click on Continue.

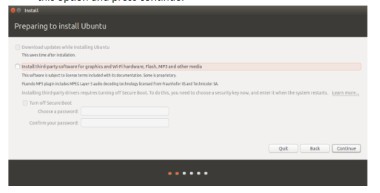
- You will be asked: “Do you want to install the latest updates from the Ubuntu server. You can choose to install updates or do it later.

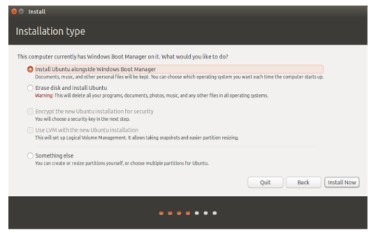
- In the next window, you shall be asked: how do you want to install Ubuntu? You have to select the option of installing Ubuntu along with windows boot manager and then click on Install Now.

- The next screen will appear showing what is going to happen to the disk. Click on Continue to proceed with the installation.
- Now, the Ubuntu personalization wizard will start and ask for location. Choose your location and then click on Continue.

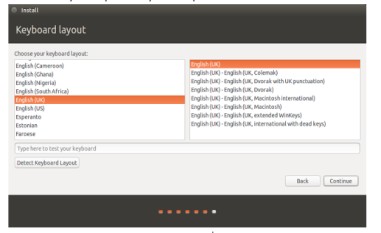
- Now, you have to select the keyboard layout and then click on Continue.

- The next step is, it will ask the name of the computer, the username, and password for creating a default user. You need to save this password as you shall need it in the near future for using the system. The next step is to enter your preferred Computer name, the Username, and the Password and click on Continue.
- Now, the files from the bootable USB drive will be copied to the original hard disk drive.
- After the setup is complete, you will be asked to do a system reboot. Click on Restart Now.


Once the system is rebooted, you will be able to see the bootloader asking which operating you want to work on. You can choose Windows or Ubuntu according to your preferences.
Conclusion:
if you follow all the steps outlined as advised, you’ll face no issues in installing Linux (Ubuntu) along with Windows 10 (dual-boot). However, you can let us know whether this tutorial was helpful for you in the comments section and if you need further queries answered.
Follow Us On:Ajit Yadav
Author Bio: Ajit yadav is a professional blogger and co-founder of WindowsClassroom. He is a software engineer by education and blogger & writer by profession.