
How to Check Graphics Card Windows 10
How to Check Graphics Card Windows 10: Well, there is no doubt that a lot of us like playing games on our PC whether it’s a desktop or a laptop. If you’re a serious gamer, then it is imperative to have high-quality graphic cards. But not every graphics card will support all the latest high-end games. If you’re looking to buy that latest shooting or strategy game to play on your system, then you need to know how to check graphic card in Windows 10 first.
If you are wondering what kind of graphics card you have, then this is just the right platform for you. In this article, we are going to share the easiest ways to check the graphics card in Windows 10. A Graphics card is also known as a video card or a video adapter. Sometimes it is also known as a display adapter. It is connected to the motherboard of your system and is responsible for the quality of the display.
There are certain desktops and laptops that come with in-built graphics cards. However, in order to play the latest games at high settings, you need to have a separate graphic card installed on your machine. However, in case you have an old machine or not sure which graphic card is installed, just follow the steps outlined to check your graphic card within seconds.
Table of Contents
Methods to Check Graphic Card in Windows 10
1. From Task Manager
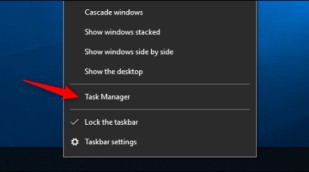
- It is very easy to check the graphics card in Windows 10. The first thing that you need to do is go to the Task Manager. You can press Ctrl+Alt+Delete to open the task manager. Another way to open it is by right-clicking on the Start button and selecting Task Manager.

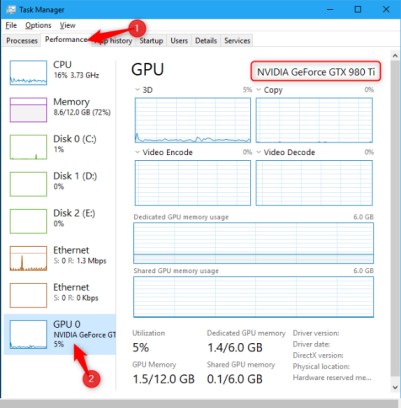
- Once the task manager opens, you can click on the Performance tab on the top of the Window. If there are no tabs, then you can click on More info.
- Then you have to select the GPU 0 option on the sidebar. It will show you the manufacturer and the model name at the top right corner of the window.
- You can also see other information like the amount of the dedicated memory present on the GPU. The task manager of Windows 10 will also display the GPU usage.
- In case your system comprises of multiple GPU’s, then you will be able to see the option GPU 1 and others as well. Each one represents a completely different physical GPU.

2. Check Graphic Card From DirectX diagnostic tool
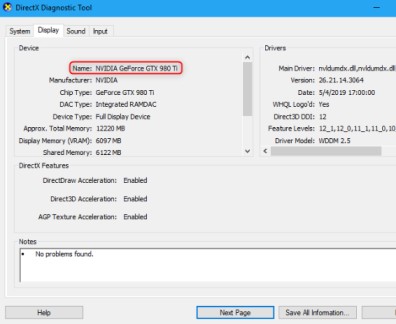
For those who are using the older version of Windows, for instance, Windows 7, they can also find the information from the DirectX diagnostic tool. This method also works with Windows 10 to check graphic card.
- For opening it, you have to press Windows+R and then type “dxdiag” within the Run dialog that comes and then click on Enter.
- The next step is to click on the Display Look in the “name” field within the “device” section. You will also find other statistics listed here as well.

There are a lot of people who have multiple GPU’s within the system. For instance, if you have a laptop with low-power Intel GPU for use with battery backup and a high-powered NVIDIA GPU to be used while gaming, then you shall be able to control which GPU is being used by the game. It is done from the Windows 10 setting application. These controls are also present within the NVIDIA control panel.
Follow Us On:Ajit Yadav
Author Bio: Ajit yadav is a professional blogger and co-founder of WindowsClassroom. He is a software engineer by education and blogger & writer by profession.