

Turn ON Network Discovery Windows 10
How to turn on network discovery windows 10: The network discovery feature permits your Windows 10 machine to find other devices and computers on a particular network. This feature gets activated automatically as soon as you connect to private networks like the one at your workplace or home. This feature is turned off when you connect to public networks. However, you can turn ON Network Discovery on Windows 10 by following the steps below.
You shouldn’t allow your PC to be discoverable on public networks where there is risk of data theft and privacy issues. But it’s necessary to turn ON Network Discovery on trusted and private networks. Whenever you enable Network Discovery feature, it becomes easier to share printers and files over a network. Whenever you connect to any network for the first time, you are asked if it is a public or private network.
Table of Contents
3 Ways to Turn ON Network Discovery Windows 10
If your Windows 10 device cannot view other devices connected to the network, then there may be two reasons: You have either assigned an incorrect network profile or Network Discovery has been turned off for some reason. Below are some methods to turn ON network discovery in windows 10.
1. Using Settings App
- Open Windows Settings
- Click on Network & Internet. The settings related to Network and Internet are displayed
- In the left panel, click either Ethernet or Wi-Fi.
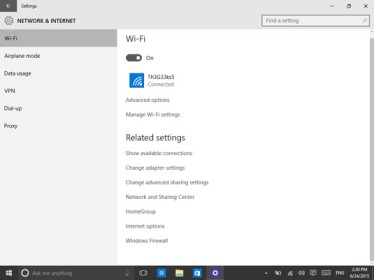
- Find the related setting section on the right. Then click on Change Advanced Sharing Options.
- Expand the network profile that has been currently assigned to your network connection.
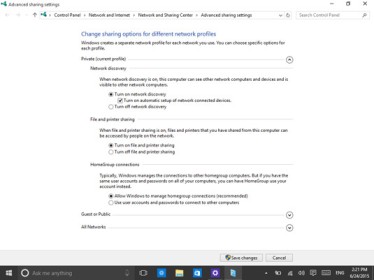
- Click on “Turn on network discovery” in the Network discover section. Tick the box next to the option that reads “Turn on automatic setup of network-connected devices.”
- Click on Save changes to turn on network discovery.
2. Using Control Panel
- Open Control Panel by typing “control panel” in the Windows Search Bar.
- Click on Control Panel Items and then select Network and Sharing Center.
- Select the Change Advanced Sharing options
- Here, you can check the checkbox next to Turn on Network Discovery
- Save the changes and then exit.
3. Turn on/off Network Discovery Using CMD
- Open the Command Prompt app by typing “cmd” in the Windows Search Bar.
- For turning Network Discovery ON, you need to run the following command in the command prompt box.
netsh advfirewall firewall set rule group=”Network Discovery” new enable=Yes
- For turning Network Discovery OFF, you need to run the following command in the command prompt box.
netsh advfirewall firewall set rule group=”Network Discovery” new enable=No
Enable File and Printer Sharing
Whenever you are connected to any private network, File and Printer share settings get automatically turned on. In this way, you can share printers, files, and folders with other devices and computers in your network. You need to turn it on manually if the network administrator is adjusting the setting.
Here is how you can turn on the File and Printer Sharing setting on Windows 10.
- Open Settings.
- Click on Network & Internet.
- In the left panel, click either Wi-Fi or
- Open the Change Advanced Sharing options setting.
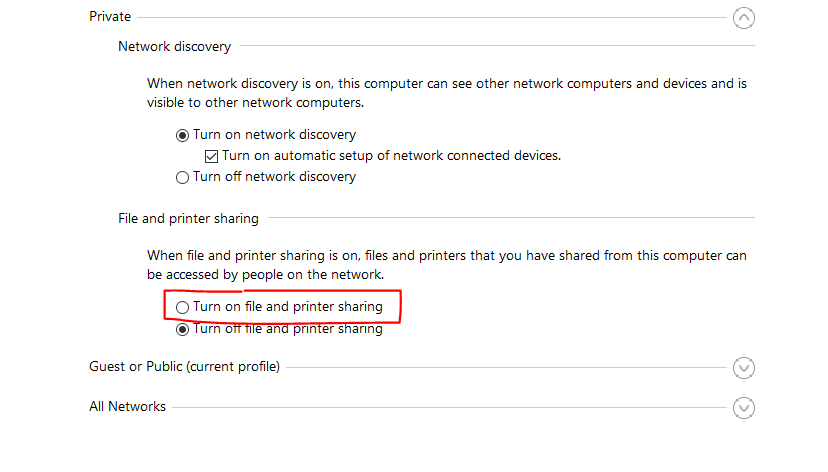
- Expand the Network Profile assigned to your current network profile.
- Access File and Printer Sharing section and click the checkbox next to Turn On File and Printer Sharing.
- Click on Save changes.
Enabling Public Folder Sharing
The public folder is usually presented in your hard drive. All the users who have their accounts registered on Windows can access it. This is the reason why it is called the Public. Any file present in this folder can be accessed by anyone using the computer. Based on the network sharing settings, the folder can be accessed by other devices and computers belonging to the same network.
For turning ON Public Folder Sharing, you can follow these simple steps.
- Once again go to Settings > Network & Internet
- Connect to the network and click on Change Advanced Sharing options.
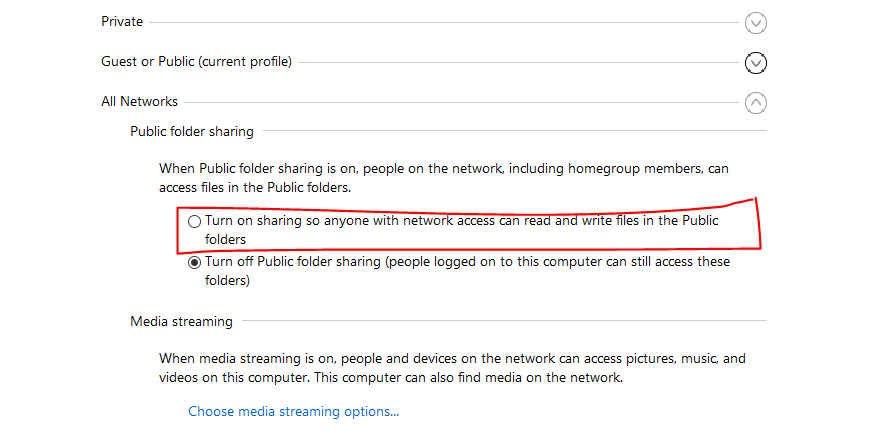
- Scroll down and expand All Networks category
- Turn On Sharing in the Public Folder Sharing section
This will ensure that anyone on the network can access the files on the public folder.
Altering Windows Settings
- Click on the Start button and open
- Click on Network & Internet Then click the Dial-Up option.
- Choose the network. Click on Advanced Settings and turn the slider to Off position against the setting Make this PC Discoverable.
- For enabling the feature, the slider can be moved to the On
If You Can’t Turn ON Network Discovery in Windows 10
If you are still facing issues in turning on the Network Discovery feature, then you will have to Run services.msc to open the Services Manager.
You need to then tick the checkboxes next to the following services:
- Function Discovery Resource Publication
- DNS Client
- UPnP Device Host
- SSDP Discovery
This should rectify any issues in the process.
Follow Us On:Ajit Yadav
Author Bio: Ajit yadav is a professional blogger and co-founder of WindowsClassroom. He is a software engineer by education and blogger & writer by profession.