How to Fix 100% Disk Usage Windows 10
How to Fix 100% Disk Usage Windows 10: The common problem that almost every Windows 10 user faces is 100% disk usage. Many people have this complaint that the disk usage reaches 100% and the PC slows down. Let us learn how to fix this issue.
Table of Contents
Ways to Fix 100% Disk Usage Windows 10
1. Fix 100% disk usage windows 10 using Task manager
You can search for the services/applications that are eating lot of your disk space. You can search using task manager present in Windows 10. Underneath the tab- Processes Click the column – Disk Usage to organize the numbers that you can see in descending order. Now close the process which is eating high memory.
This will help you know which application is consuming lot of disk space.
2. Fix 100% disk usage error that occurs because of Google Chrome
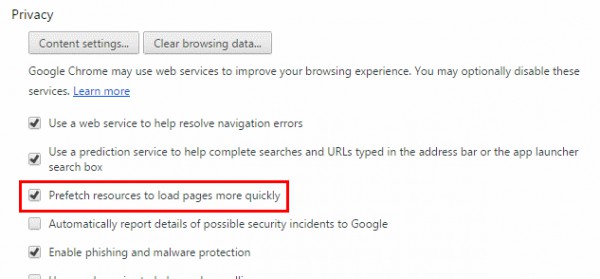
For Google Chrome the pre-load feature of web page is the culprit. Just turn it OFF by following
- Open Settings
- Click on Show Advanced Settings
- Click on Privacy
- Now uncheck the option that says – “Prefetch resources to load pages more quickly”

3. How to fix 100% disk usage windows 10 that occurs because of Skype
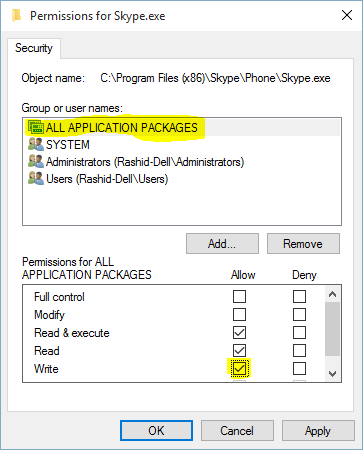
For Skype the increased disk usage reduces when the permission is given for the group – ALL APPLICATION PACKAGE. You can follow the steps given below to resolve 100% disk usage problem that arises due to Skype.
- Close the Skype app.
- To do this, right click on Skype icon present on the taskbar and then hit – Quit
- Open- My Computer/This PC and head to C:\Program Files (x86)\Skype\Phone\
- Right click on the file – exe and head to – Properties
- Underneath the tab – Security and select – ALL APPLICATION PACKAGES and then click – Edit
- In the next box that is visible select ALL APPLICATION PACKAGES. Now, tick the checkbox – Allow for Write permissions.
- Click – Ok to proceed
- Hit – Ok again.

Once done you will see that Skype will show reduced disk usage upon opening the task manager.
4. Fix error 100% disk usage that occurs because of Windows features
- Open – Command Prompt as administrator and utilize the command below net.exe stop “Windows Search”
- Utilize the following command to start your Windows again
- net.exe start “Windows Search”
- Turning OFF Windows search- How to do it?
- Press- Ctrl+R to expand – Run utility
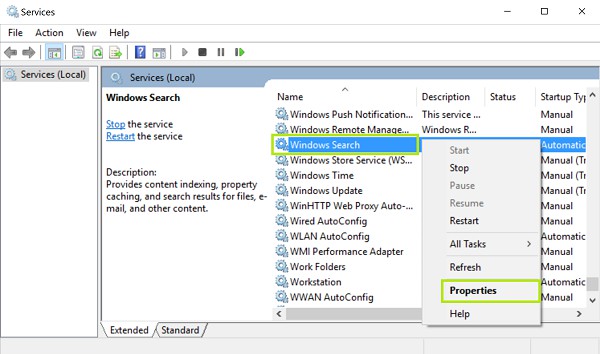
- Type – Services.msc and hit – Enter
- Right click on Windows Search service and head to Properties.
- Underneath – General tab and now set – Start type to – Disabled
- Click –Ok to proceed

How to Check Weather the Issue 100% Disk Usages is Fixed or Not
This is the best to identify 100% disk usage and here how you can carry out disk check
- Click – Windows key+X simultaneously and head to – Command Prompt option so that you can run – CMD to access administrative privileges.
- Click – Yes seen on prompt window
- In command prompt enter – exe /f /r and press- Enter
- Next type- Y and confirm the disk check for next restart
- During your next restart disk check utility will automatically run and you can now check in Task Manager about disk usage to check if the issues has been fixed.

