
How to take a screenshot on windows 8, 10
It is easier to take screenshots in Windows 8 and windows 10 as Windows makes the job simpler. Rather than using the button- Print Screen and then paste to the paint application, you can now enjoy taking the screenshots by saving them automatically to the folder- Pictures in png format with a click a few buttons. Let us learn how to screenshot windows 8 and windows 10
- Set up the respective screen that you wish to capture screenshot of.
- Hold down the two keys- Windows key & Print Screen.
- You can view the new screenshot which will appear in Library>Pictures folder.
Table of Contents
How to take Screenshot on Windows 8, 10 of Entire screen
- Press the button- Print Screen/Prt Sc
- Open paint application
- Now press- Shortcut keys “Ctrl+V” so that you can paste your screenshot in paint.
- To save the screen shot- Press Ctrl + S
Another interesting post: Make windows 10 look like windows 7
Screenshot on Windows 8, 10 of One window –
- Select the window that you wish to capture by clicking it.
- Now hold down – Alt while pressing the Prt Sc/Print Screen simultaneously.
- Open paint application
- Press Ctrl + V in order to paste your screenshot in paint application
- Now simply press Ctrl + S to save your screenshot.
Snipping tool to take the screenshot in Windows 8, 10
The Snipping tool comes with all versions of Windows except Windows XP
- While using Windows 8 click on the “Start Screen” and type “snipping tool”. Select the tool from the search results you get on the screen.
- Secondly select the Snip shape which is set to “Rectangular Snip” by default. You can also change the shape of the Snip simply by clicking the arrow button that you see besides Mode button.
- “Free-form snip helps you use free hand to draw any shape using your mouse. The section inside the given shape will be automatically snipped.
- “Rectangular Snip” allow you to pick a rectangular area that gets snipped.
- “Window Snip” helps you choose the entire window to be snipped.
- “Full-screen” enables snipping of full screen
Customize Snip border
When you snip any shape you will see a red border on all sides, which is a default setting. You can customize this setting by pressing the Tool tab located on the top left of toolbar located on your Snipping Tool. Now choose the options seen in drop down menu. Click on options menu and simply uncheck the particular box shown next to “Show selection ink after snips are captured”. This will help eliminate the border from further snips.
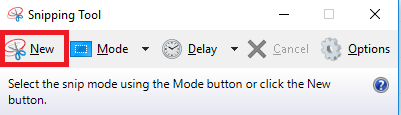
Create new Snip
Click on New button to begin with the selection. You will see the screen fade and here you can draw the Snip area or choose the window if you have picked Window Snip. Now release the mouse while you select to make a new snip.
Save the Snip
You can save your screenshot now. Ideally in Windows 8 and windows 10 the default file format is PNG.
Video Tutorial
We though you might like reading – How to install fonts windows 10
Follow Us On:Ajit Yadav
Author Bio: Ajit yadav is a professional blogger and co-founder of WindowsClassroom. He is a software engineer by education and blogger & writer by profession.