

How to Restore Windows 10
How to Restore Windows 10: Although Windows 10 is pretty stable compared to the earlier editions of Windows, you may encounter times where your OS may start giving you problems. It is exactly for this purpose where you can restore Windows 10 to an earlier stable condition without losing any of your important files. In this guide, let’s learn the how to restore Windows 10 to a stable condition.
Your PC creates restore points that serve as a safe benchmark to get rid of unpredictable changes on the computer. To undo the failed installation, update, or mishandled registry edit, Windows 10 takes you back to the point before such problems originated. The features allow retaining the important files and documents saved on the PC.
Though a very indispensable feature, it is imperative to understand that the System Restore feature is disabled by default on Windows 10. Hence, before using Windows 10, users must enable the feature and then create restore points.
Table of Contents
Restore Windows 10
Step 1- Enable System Restore on Windows 10
- Open the Start menu
- Search for the option by typing “Create a restore point” and click on the result. The option opens the System Properties window.
- On the screen, you can see the “System Protection” tab. Select a drive (preferably the System drive i.e. C:\), and click “Configure”. Then, click the Ok

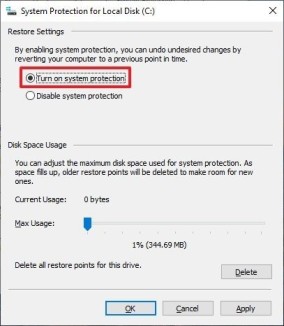
- A new dialog box opens up, “System Protection for local disk (C:)”.
- Switch the Turn on system protection button to ON. This enables the user to retract the unwanted changes by restoring the computer to a previous appropriate point. Though Windows 10 manages the disk space automatically, the user can customize the limit of the disk space that can be used for system protection.

- Click on Apply, and then the Ok

We have a guide on how to create restore point in Windows 10 that already exists. So you can go through that article if you’re unsure of how to do it.
The next step is with regard to how to restore Windows 10 using System Restore facility.
Step 2- How to recover using System Restore Windows 10
If after a failed installation or update, the system may show some performance issues. The user can easily undo them with a previously created System Restore point.
- On the Windows search bar, type “Create a restore point” and click on the given result.
- In the dialog box, under “System Protection”, click on “System Restore” button.
- To reconfirm, click on the option “Next”. The information on the screen indicates that the system would restore the files and settings that would not affect your documents, pictures, and any form of personal data. The restoration may uninstall the recently installed programs and applications.
- Next, choose a restore point which was saved earlier by the user or the system automatically.
- Click on “Scan for affected programs”. It informs about the apps and programs that would be uninstalled due to restoration.
- Click on the :Close” button
- Now, tap the “Finish” button.
Once all the steps are completed, your computer is restored to an earlier point you chose. Before you restart the computer, make sure all open files are saved. The system restore function restarts your PC to apply the modifications.
What to do if the System Restore feature doesn’t work?
Some problems in Windows 10 could prevent the System restore from working properly. The solution is to start Windows 10 in safe mode. Under the safe mode, Windows only runs essential parts of the Windows operating system whereas the critical apps, settings and drives are disabled. The System Restore feature runs successfully within the Windows 10 Safe Mode.
Steps to Restore Windows 10 in Safe Mode
To do this, you need to reset with Windows Advanced start up
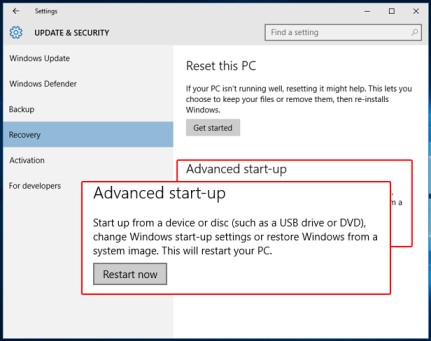
- Go to Start
- Click on Update and Security
- Click Restart now under Advanced start-up.

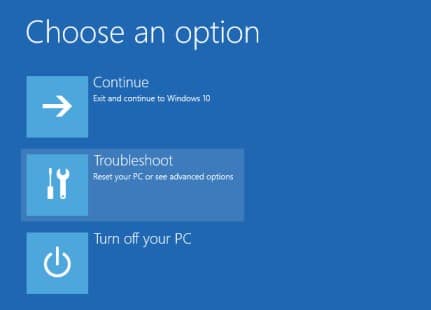
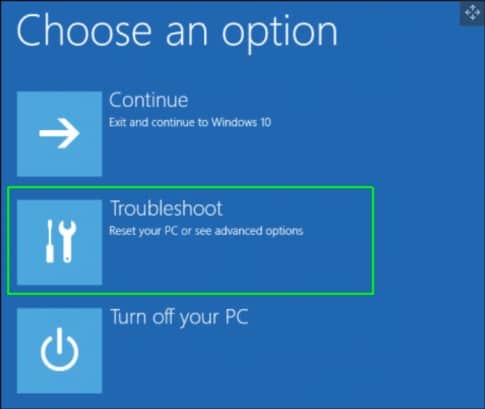
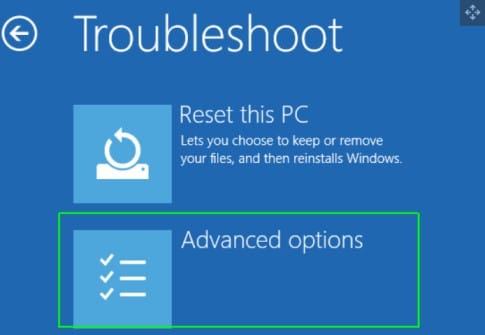
- As Windows restarts, it displays Choose an option Select Troubleshoot > Advanced options.

- Click System Restore and use the system restore feature as explained before.
How to recover windows 10 with more serious problems?
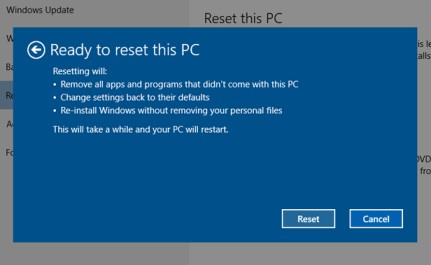
System rescue doesn’t rescue your PC from all critical issues. Hence, Windows 10 gives you an option to restore at a factory fresh state without affecting your documents. It removes all apps and software installed. Before going for this option, it is important to take a backup of necessary apps and files.
Steps to use “Reset this PC” function
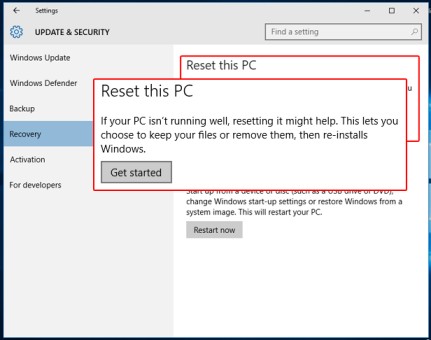
- Go to Start > Settings > Update and Security.
- Click > Under “Reset this PC” option, click on Get started.

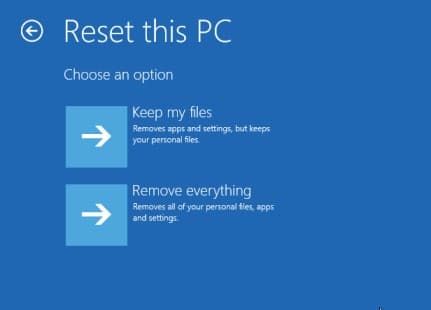
- With Reset this PC feature, you can either keep or remove all the files. Then, it re-installs Windows. The Reset option removes the installed apps that didn’t come with the PC.

- The next screen displays two options- 1) Keep my files, 2) Remove everything. The option 1 allows users to save their personal files and reset the PC. Click on “Keep my files”.
Other Methods to Restore Windows 10
1. Restore Windows 10 using Windows Startup Repair
It may happen that your Windows 10 device doesn’t load or keeps crashing all the time. There are other two methods to repair the PC. Users can run Startup Repair to get rid of this issue.
- First, you need to enter Windows 10 Advanced Startup menu by pressing F11 key as soon as you restart Windows 10.
- Under the advanced startup menu, select Troubleshoot.

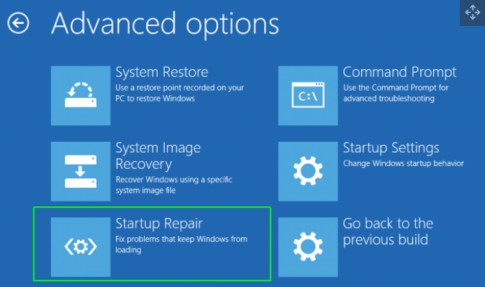
- Click “Advanced options”.

- Under Advanced options, click “Startup Repair”. Startup Repair fixes the problem of loading Windows.

In a few minutes, Windows would repair the problem. If the problem still persists, your PC doesn’t have a startup problem.
2. Disk scan to Restore windows 10
Windows 10 may experience issues due to corrupt files. If you have to restore in safe mode, you should still run a disk scan to identify problems.
- Type “cmd” in the search box.
- Next, right-click on Command Prompt and select “Run as administrator”.
- In the Command Prompt window, type “sfc /scannow” and press Enter.
The scans run for a few minutes to identify and fix the corrupted files.
Follow Us On:Ajit Yadav
Author Bio: Ajit yadav is a professional blogger and co-founder of WindowsClassroom. He is a software engineer by education and blogger & writer by profession.